Popups, sometimes called modal popup boxes, a modal dialog, or modal pages, are call-to-action modal windows with graphic elements, which automatically popup and overlay the page at a specified moment under specific triggers and conditions, to focus a user’s attention once they have taken action, and increase conversions.
In this post, we will help you to easily create a popup with the Popup Builder feature of Elementor pro, and share with you a popup builder add-on that completes Elementor by allowing you to choose from a variety of popup presets. Countdown, discount, Cookie/GDPR, sale, subscribe, etc.
Main elements in this post (click to jump)
1. Create popups with Elementor Pro
2. Create popups with the ultimate popup builder plugin for Elementor
1. How to create Popups with Elementor pro

Creating a popup with Elementor is easy. You can design your popup with the visual drag and drop interface of Elementor.
Assuming you have installed Elementor Pro, follow these 10 steps:
- In your WordPress dashboard, go to Templates → Popups → Add New.
- Give your popup a name and click “CREATE TEMPLATE”.
- Select a popup template by clicking “Insert” (you can also start a popup from scratch).
- On the Elementor editor, start customizing your popup, and add/replace the default content (text, images…) with your own.
- Choose an entrance/exit animation.
- Enable or disable the overlay and the close button.
- Once you are done, click “PUBLISH”.
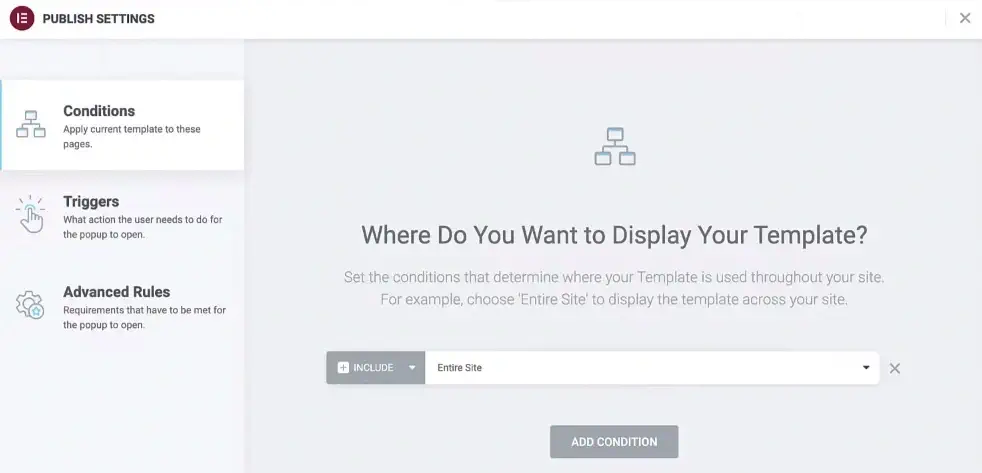
- Next, you’ll have to set the conditions (Determine on which pages you want your popup to display).

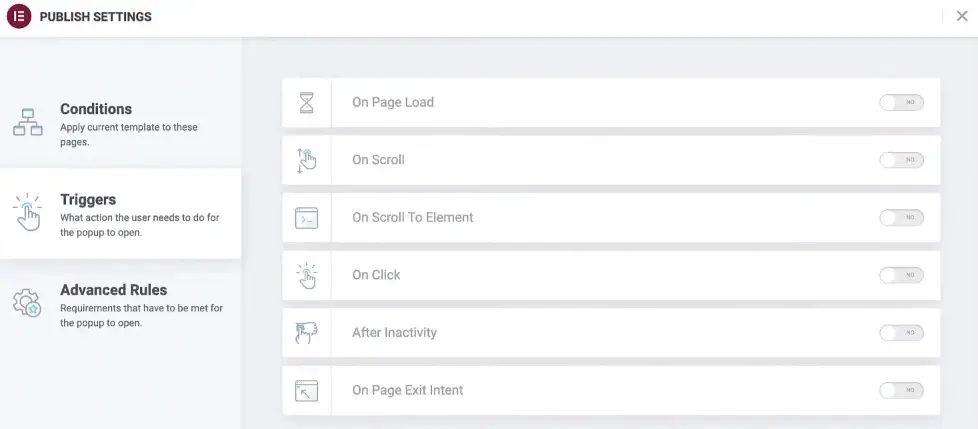
- Then, the triggers (What will trigger this popup to display).

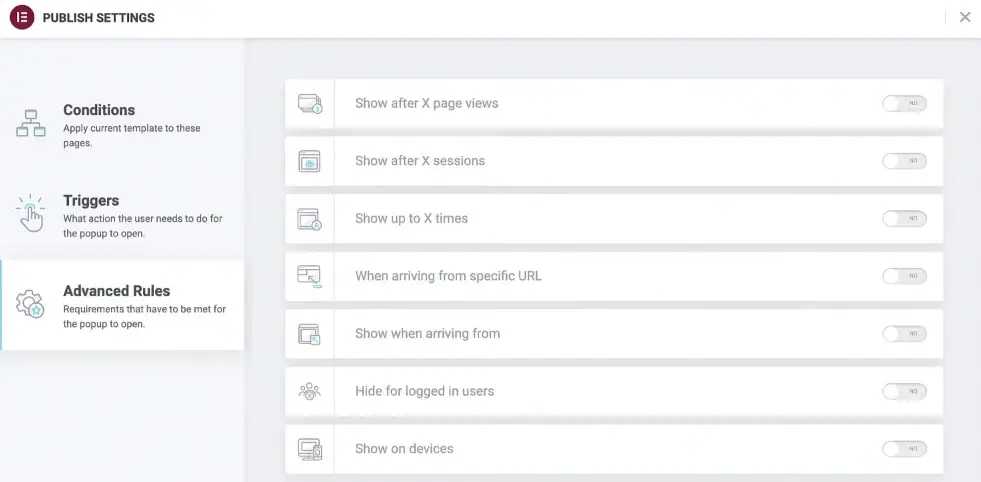
- And finally the advanced rules (The requirements need to be met for the popup to appear, for example after X page views, if the visitor came from a specific URL.. etc).

Note: If you chose the On Click trigger, you’ll have to configure that button. To do so:
- Go to the page that contains that button, and click “Edit with Elementor”.
- Click the Button widget to turn it into an editing mode.
- On the button options under the Content tab, set the link to Popup by clicking “Dynamic” on the “Link” section.
2. Stylish Popup builder for Elementor

JetPopup by Crocoblock is one of the best popup add-ons for Elementor. Allowing you to create any type of popups, and make beautiful changes/unlimited customization to the created ones, without having to write a single line of code. All changes can be applied effortlessly using the style settings in the Elementor editor.
Why JetPopup
Here are the main features of JetPopup:
- Easy to use/Everything is drag & drop
- Unlimited customization
- Responsive popups (for both mobile and desktop)
- Variety of ready popup presets
- Any type & form of popups
- Maximum popup triggers
- Any popup can be animated (Fade, Zoom In, Zoom Out, Move Up, Bounce In, Bounce Out, Slide Up, Slide Down, Slide Left, Slide Right, Horizontal Flip, Vertical Flip, Rotate)
- No need to build everything from scratch
- Include & exclude conditions
What popup type can I create
Decide what type of popup you want.
- Classic popup
- Bar popup
- Slide-in popup
- Bordering popup
- Bottom/Top Side popup
- Full View popup
- Custom popup
What popup content can I create
Decide what your popups will communicate, you can literally create any type & form.
- Email subscription popup
- Discount/Coupon popup
- Yes/no form popup
- Sign up/register form popup
- Countdown popup
- Contact us popup
- Video/Image Gallery popup
- Collect form popup
- 2-Step popup
- Feedback & Surveys popup
- Business Hours popup
- Call us now popup
- Info Card popup
- GDPR popup
- Cookie Policy popup
Popup trigger types
Decide when your WordPress site popups will appear on a page.
| Trigger | What is it about |
|---|---|
| On opening/Onload | Make the popup window show up when the page opens |
| User try exit/Exit-Intent | Make the popup window show up when the visitor wants to close the page |
| Page scrolling | Display a popup when the user scrolls the page |
| Button/element click | Set the popup for a specific Elementor widget to appear on click |
| User inactive time | When the visitor has already spent some time on the page |
| Onset date | Set the specific date when the popup will start appearing |
How to create a popup using JetPopup
After installing JetPopup, in your WP dashboard:
- Navigate to the JetPopup → Add New Popup.
- Give it a name and click Edit with Elementor.
- Use widgets and settings to make your popup eye-catching.
- Next, click the Settings icon on the left bottom, and set the needed display conditions (pages where you want the popup to display).
- Select an animation effect for the popup.
- Select the trigger.
- Select the time for the “Repeat showing popup in” option if desired.
- Click the Publish button to save the popup.
This is it!
If you want to pick a pre-designed popup from the JetPopup Library instead of creating a new one, simply:
- Navigate to JetPopup > Popup Library.
- Use the filter option to find the one.
- Click the +Add button to start editing this popup template.
- Click Yes to proceed.
- You’ll be redirected to Elementor, where you can customize your popup according to your needs.
How much does JetPopup cost?
JetPopup costs $22 for 1 website only, it comes with 1-year of product updates and 1-year of Zoom & Chat support. For multiple websites, you can choose the All-Inclusive Unlimited plan on the pricing page.
Is there a discount/promo code for JetPopup
Yes, Crocoblock frequently offer discounts and special offers for up to 40% off, to see if any promo codes are available, you can check their official Crocoblock page, always updated with fresh deals and discounts.
